Gale Leach -- Author
  • Home
  • Books
    • The Art of Pickleball >
      • The Art of Pickleball
      • Excerpts
      • Reviews
    • The Disappearance >
      • Chapter One
      • Reviews
    • Bruce and the Road to Courage >
      • Bruce and the Road to Courage
      • Excerpts
      • Reviews
    • Bruce and the Road to Honesty >
      • Bruce and the Road to Honesty
      • Excerpt
      • Reviews
    • Bruce and the Road to Justice >
      • Bruce and the Road to Justice
      • Excerpt
      • Reviews
    • Bruce and the Mystery in the Marsh >
      • Excerpt
      • Reviews
    • Bruce and the Road to Freedom >
      • Bruce and the Road to Freedom
      • Excerpt
      • Reviews
  • About the Author
  • Pickleball
    • Pickleball Tips
  • Author Blog
  • Leach Lines
  • Contact
  • Please Leave a Review
  • The Disappearance

The Five Elements of Pickleball Placement

10/18/2015

3 Comments

 
Picture
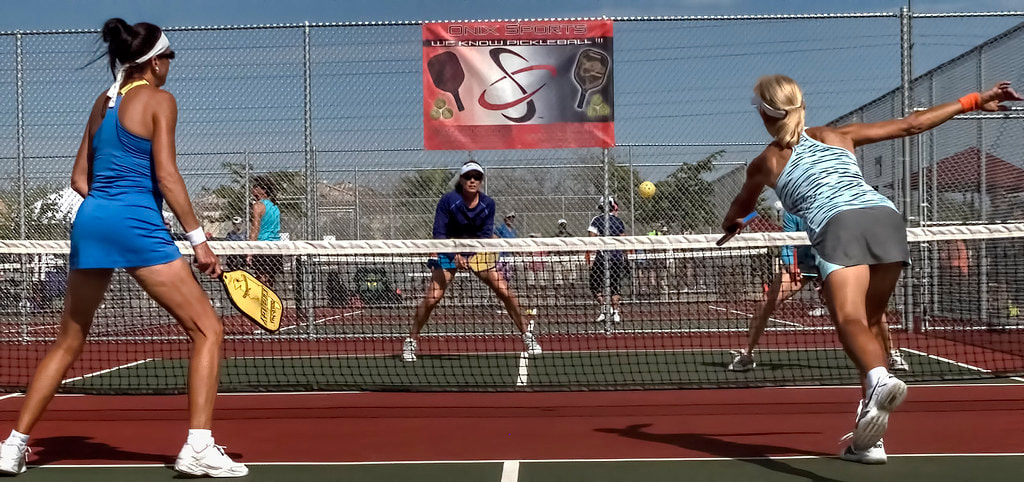
When I watch high-level pickleball, I notice two things: the players plan and execute shots that seem effortless, and those shots land where they want them to. Their play seems effortless because they’ve practiced long and well (or else they’re naturally great players—some folks have that advantage). They’ve learned what shots work well in various circumstances, and they’ve learned the elements of good ball control and placement.
 
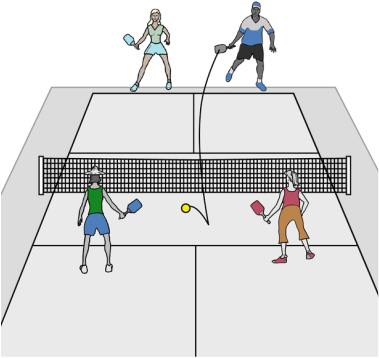
Mastering ball placement is critical for attaining higher levels in pickleball play. What factors determine where your ball will land?
 
1) The angle of your paddle (up and down & left and right)
2) The angle of your swing (up and down & left and right)
3) Your wrist movement, if any
4) The power behind your hit
5) Spin
 
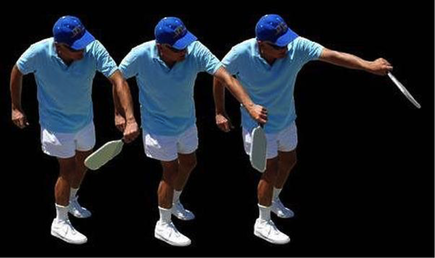
Before you concentrate on ball placement, though, you must first consider how you contact the ball. Focus your attention and skills (such as good footwork and proper form with your stroke) to the contact of the ball. Only after this focus on ball contact should you consider how you place it on the court.
 
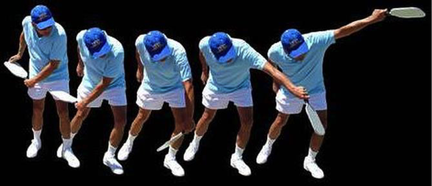
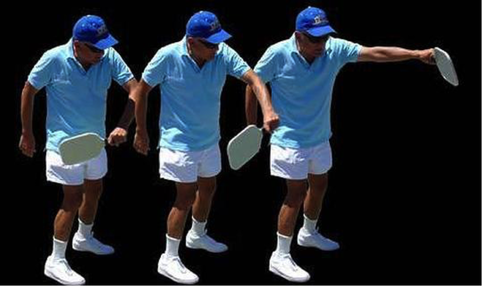
Take time to get into position early enough to take a proper backswing before hitting the ball. If that means halting in mid-court, so be it. Stop, prepare your swing, and focus on contacting the ball. Many players say you should think about “swinging through the ball,” as this makes 


Read More
3 Comments

The 1-2-3 Approach: Get to the Net After You Serve

2/3/2015

2 Comments

 
PictureThe Third-Shot Drop Shot
In my last tip, I explained why you want to rush to the non-volley-zone (NVZ) line: you are able to cover the court with far less movement. Other reasons are the additional power afforded to hard shots by the shorter distance, being able to target spots close to the net with more accuracy and ease, and the quick response time needed by your opponents to return your net volleys. (Of course, you need good reflexes to hit theirs, too.)

If you are serving, your team is at a disadvantage from the start. One of your opponents is already at the NVZ line, and the opponent receiving your serve will likely hit a long, relatively slow return shot that will provide enough time for them to rush to the net. You can't do anything about that, because you and your partner must remain in the back court to let the ball bounce (because of the "double-bounce" rule). 

Assuming your opponent returns the ball deep to center court, your best shot would be one that will give your team time to rush the net safely. Most players and coaches recommend you make a drop shot (some call this a dink) just over the net into the NVZ. This is a tough shot, as those who deliver the ball too far back in the court or into the net will tell you. This is considered the best shot, however, because 1) your opponents are already at the net, or they're on the way; 2) it is slower and softer, and because it drops in the NVZ, your opponents must let the ball bounce, allowing you time to get to your NVZ; and 3) it has a higher percentage of success than a hard shot against opponents who are ready to volley the ball back.

Discuss this tactic ahead of time, so your partner will know when to move with you. If your shot goes too deep, and you can't get to the NVZ in time, you and your partner must STOP and assume the ready position the moment your opponent hits the ball. Make sure your feet are shoulder-width apart and your paddle points toward the ball. You won't be in a good position, but you'll be ready to make the best of whatever comes your way.

2 Comments

When and How to Dink

1/10/2015

1 Comment

 
One thing you see a lot when watching high-level players that is often missing from other games is the soft game--all that crosscourt dinking at the net. Beginning players tend to avoid the dink, preferring to hit more hard shots, and that's one of the reasons their balls end up in the net or out of bounds more often.

The difficulty is knowing when and how to dink.

If you need to hit a low ball, try a dink, drop shot, or lob. What to do depends on where you are on the court. If you’re close to the non-volley zone line, dink the ball. From further back, try a drop shot that flies low and lands just over the net. If you can’t do either of those, lob the ball high, over your opponent’s head near the baseline.

If you can’t make a good offensive shot, a dink may be a good alternative, especially if your opponents are already in the forecourt. If one or both of your opponents are in the backcourt, however, especially if they are good at dinking, refrain from the dink, since this will only cause them to rush up to the net to play the ball. If your opponents are not good at dinking, or you don’t think they will be able to get to the ball from the backcourt, a dink can be a good play.

The key to good dinking is patience. You must continue to dink until a proper moment appears to execute a different, offensive shot. The best dink shots arc just over the net, landing close to the net on the other side. In doubles, it can be wise to send the dink cross-court because the ball can travel further, reducing the risk that it will travel out of the non-volley zone. Try to maneuver your opponents around the court until one of them makes a mistake, either hitting the ball into the net or high enough that you can make an offensive shot. When this occurs, volley the ball back quickly.

While dinking, it helps to let the ball travel higher before hitting it. Some people say you should hit the ball closer to the ground, citing that its faster motion assists in getting the ball over the net. However, the dink is a soft shot and doesn’t require much energy. Let the ball approach the top of its arc. At that point, you have the option of either hitting another dink or making a fast slap shot if it bounces high enough.

Dink shots have no real speed behind them, so breaking out of dinking requires that you add a little more energy to the hard swing you would normally make (when it’s time).

Don’t back up to play the dink off the bounce when it could be taken in the air. Dinking is done for two reasons: to change the pace of the game and to keep the ball in play until you can end the rally with a put-away shot. When you’re given the opportunity to make the put away, seize it.
1 Comment

Backhand Techniques

11/16/2014

2 Comments

 
Picture
The picture on the left shows the backhand stroke Vic started with. The paddle swings through fairly flat, parallel to the ground. Vic hits the ball forward of his body with his wrist locked through the entire swing. 
As with all strokes from the baseline, it is important to make room for the shot: step back or forward, as necessary, in preparation for the movement of the shot itself. ​
Backhand Techniques
A while ago, I wrote an article for the USAPA newsletter discussing how people practice pickleball. One of the folks who gave me input was Vic Avery, and during research for that article he offered some other thoughts, too. One was about backhand shots. He said, "I had a serious problem in singles because of a weak backhand on groundstrokes. Once, while watching Pat Kane 's backhand, I saw he used a totally different technique from mine. I was using the tennis style: square your body to the court (facing the side fence) and use mostly arm for the power (a sweeping motion in a plane parallel to the ground). Opponents found it easy to read the direction and speed of my shots. I tried his method—punching it by:


  1. straightening your arm and getting wrist action at the end, 
  2. contacting the ball almost straight in front of you, and 
  3. having the paddle travel in an arc perpendicular to the ground, from low to high.
The result was far more power and the ability to go either left or right at the last second.”

Vic's reply caused me to start thinking about the different backhand techniques I have seen in play and to wonder about the evolution of pickleball strokes that are separate and distinct from those we brought with us from tennis, racquetball, or other sports. I was also curious about the backhand particularly because many players say they find it more difficult than their forehand strokes. So I asked a sampling of players again: “tell me how you handle the backhand in pickleball.”

Rock Kane wrote, “Whenever I can, if I know someone is going to my backhand, I try to get quickly into a position to be able to use my forehand which is my stronger hit.” Many players agree with Rock, saying their forehand strokes are stronger than their backhands. Certainly, if you have time to get into position for a forehand stroke and it won't pull you so far out of position that your next return might in jeopardy, I'd agree that taking a forehand would be preferred by most. Rock continued, “Also, when reaching for a backhanded shot, I slip my hand to the end of the paddle [handle] to give me more paddle hitting surface in the reach.”

Dick Lewis said his baseline backhand is “very similar to the tennis groundstroke.” He went on to say, “The backhand shot should be easier then the forehand.” I mentioned that this goes counter to what most people say, although I have always felt that backhand and forehand should both be equally difficult (or easy, depending on your point of view). I asked him why he thought the backhand should be easier? His answer, regarding the backhand from the baseline: “You need to turn sideways to the net. By doing this you already have your arm back and in the proper position on the backhand” [because you don't have to take as much backswing compared to the forehand groundstroke].

Dick then described a number of ways to hit the ball (imparting topspin, hitting the ball flat, and cutting for backspin, which he says is the hardest shot but very effective against lower-level opponents). Lastly, he described “a different backhand shot where you bring your arm forward and snap your wrist at impact to the ball. The shot would be similar to the flat shot. With practice this can be the easiest of all backhand shots.” He and Vic are speaking the same language.

I asked him, “What about the backhand ‘pops' that are done from the non-volley-zone line?”

“While at the net, you would have a continental grip, which is where the "V" between your thumb and index finger would be in the center of the grip. The paddle is held in the ready position, which is chest high. The quick backhand would be hit by twisting your body to the left, if you were right-handed, and slapping the ball, moving the paddle forward. The paddle should never be taken back further then your peripheral vision. An example would be, facing the net, taking the paddle back as far as you can see without moving your head.”

Finally, we discussed the shot he described with the flick of the wrist. I told him I've seen this done up at the non-volley zone, too. He agreed, but said he uses it only with high backhand overheads.

To put a wrap to this research, I called Vic back, and we went out to the court together so I could see just what he meant in action. I photographed his movements for his original “tennis-type” stroke as well as the new strokes, both at the baseline and the non-volley zone line. Here's what he showed me and what he explained in more detail.
Picture
The “new” backhand is shown on the right. In this stroke, Vic's wrist is not locked but can be seen to unleash its own power just at the moment the paddle contacts the ball. This stroke is made perpendicular to the ground, going from the backswing down and finishing up high. Much additional power is gained in this type of stroke due to the wrist action.

Picture
The picture on the left shows the standard stroke when close to the net. Again, it's a flatter stroke, and the wrist is locked throughout the swing.


Picture
In the new version of the backhand at the non-volley zone, the wrist snaps at the moment of impact, imparting extra power to the ball.


Picture
Finally, the overhead backhand shown at left works beautifully because of the wrist action given to the shot. Vic says it's also easier to add spin to the ball when using more wrist in the shot.


2 Comments

    Subscribe for my best content

    Blog Mailing

    Author

    Gale Leach lives in Arizona with her husband, two dogs, and a cat. When she's not writing pickleball tips, she's working on the second in a new series of novels for young adults and updating The Art of Pickleball.

    Categories

    All
    Backhand
    Body Position
    Carbohydrates
    Chris Sacca
    Communication
    Control
    Court Position
    Dink
    Drills
    Errors
    Etiquette
    Extraordinary Tennis For The Ordinary Player
    Extraversion
    Falling
    Fear
    Five Factor Test
    Food
    Health & Fitness
    Healthy
    Injury
    Level
    Meditation
    Mental Game
    Non-Volley Zone
    Paddles
    Patience
    Personality
    Pickleball
    Placement
    Practice
    Rating
    Relaxation
    Resolutions
    Right And Left Handed
    Right / Wrong
    Rules
    Safety
    Simon Ramo
    Singles
    Skill Level
    Snacks
    Stacking
    Strategies & Tactics
    Strokes
    Tournament
    Unforced Errors
    Visualization
    Websites
    Winning And Losing
    Yoga

    Archives

    May 2020
    April 2020
    January 2020
    November 2019
    October 2019
    December 2018
    October 2018
    September 2018
    July 2018
    June 2018
    May 2018
    March 2018
    September 2017
    August 2017
    June 2017
    May 2017
    April 2017
    September 2016
    August 2016
    May 2016
    April 2016
    February 2016
    January 2016
    November 2015
    October 2015
    September 2015
    August 2015
    July 2015
    June 2015
    May 2015
    April 2015
    March 2015
    February 2015
    January 2015
    December 2014
    November 2014
    October 2014
    September 2014

    RSS Feed

© 2020 Gale H. Leach