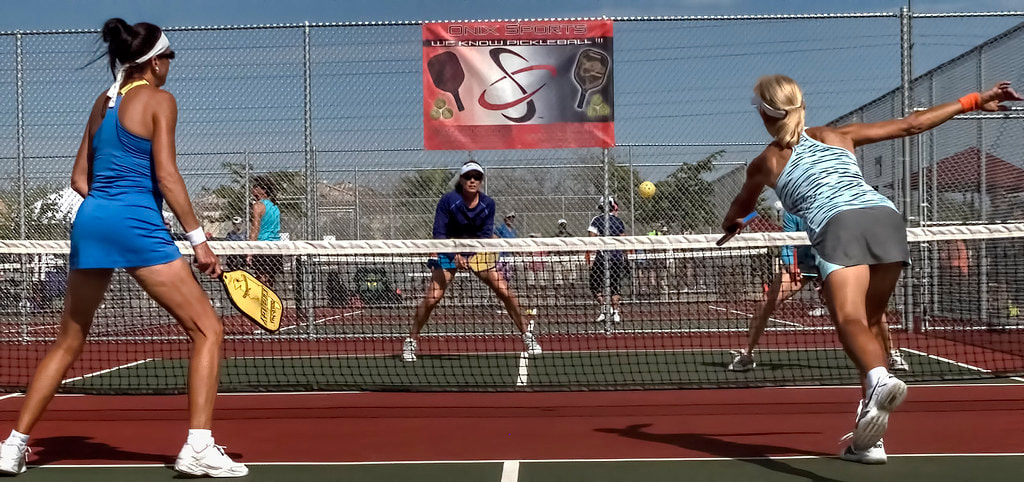
Gale Leach -- Author
  • Home
  • Books
    • The Art of Pickleball
    • The Disappearance
    • Bruce and the Road to Courage
    • Bruce and the Road to Honesty
    • Bruce and the Road to Justice
    • Bruce and the Mystery in the Marsh
  • About
  • Pickleball
    • Pickleball Tips
  • Author Blog
  • Leach Lines
  • Contact
  • Reviews
  • Store

Stacking--Why and How

10/20/2018

0 Comments

 
If you've had an opportunity to watch a tournament and saw stacking in action, you may have wondered why the players were moving around the court, standing together, or standing outside the court completely. If you're curious about stacking and how and when to incorporate it into your game, read on.

Stacking is used during tournament play to exploit a team's strength and minimize its weakness. The technique increases the number of times a person plays on the right (even) or left (odd) side of the court.

According to the rules, the non-serving partner or the receiver's partner may stand in any position (even off the court), as long as they stay on their side of the net. Therefore, both team members may stand inside their service court, and partner of the person receiving the serve may stand outside the court at the time of the serve. 

Some examples may help explain how and why stacking works, and why you might want to try it.
Picture
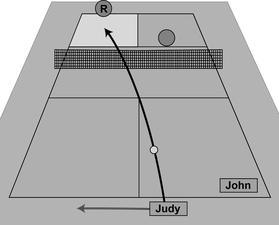
1) Backhands in the center. Judy is right-handed and her partner, John, is left-handed. They don't like having both backhands in the middle, so when Judy serves, they stack. Both partners stand in the right service box until she serves. Then Judy moves to the left side of the court, while John stays put. At the end of the rally, they switch sides again, so they will be in their correct places for the next service. (Note: If Judy is uncomfortable with John standing so close, he can wait outside the service box until Judy moves.)

2) Strong or weak forehand or backhand. If partners are like-handed, but one or both have strengths or weaknesses that could be exploited, they could use stacking to their advantage. Right-handed Gloria has an average forehand, while her right-handed partner, Diane, has a forehand that is exceptionally strong. Diane would rather play in the left court to cover the middle and take advantage of her forehand strength. The same would be true for a partner with a weak backhand. When players are like-handed, putting a weak backhand in the right court with a strong forehand in the left court just makes sense.
Picture
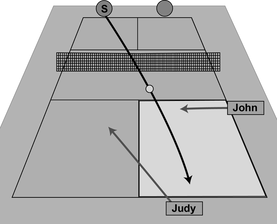
3) When receiving. The players in example 1 above are receiving the serve. Judy is the receiver, and John would normally be up at the non-volley-zone line in the left court. However, since John would rather be on the right, he stands outside the sideline, just behind the non-volley zone line on the right. ​After Judy returns the service, John moves in, and Judy rushes to the non-volley-zone line on the left.

Stacking isn't something you must do, but it can help your team play better and more consistently. You can choose to stack during only a portion of the game. Stacking can confuse your opponents and is sometimes good as a way to change things up. 

If you understand what stacking is and how your team (and your opponents) can use it, you'll have an advantage over those who don't.

​Happy stacking!

0 Comments

Pickleball the Hard Way: Make the Game Difficult for Your Opponents

8/21/2016

0 Comments

 
Picture
When playing competitive pickleball, you want to make things hard for your opponents. Too often, though, we play into their hands, giving them advantages without meaning to.

Advantage #1: Allowing your oppo-nents to take position at the net.
When you're serving, your opponents already have the advantage since one of them starts at the non-volley zone line. Then a few years ago, the "third shot drop shot rule" came into favor. The thought was that using the softer, slower drop shot would allow you and your partner to move up from the baseline (where you were stuck as servers because of the double bounce rule) and get to the net. 

That made sense—but returning a drop shot also allows your opponent in the back court to run up to the non-volley zone. That's not what you want. 

Remember:
​If you can keep your opponents—even one of them--
​in the back court, do it.
The net position affords many advantages. At the net:
  • you can reach a greater number of shots without moving very far;
  • you can return balls faster and with more momentum;
  • you can target positions on the court with better accuracy;
  • your opponents can't target your feet;
    and the greatest reason is . . .
  • you can hit DOWN.​
[For in-depth information, read my post, "Get Thee to the Non-Volley Zone Line!]
​

​Advantage #2: ​Hitting the ball in an upward arc within the opponent's reach.
The farther you are from the non-volley zone line, the more you must angle the ball up to get it over the net. Any ball traveling in an upward arc is ripe for a put-away smash that may be hard or impossible for you to return. One of the hardest things for me as a new player was to keep the ball low over the net. 

If you have to bend to retrieve a shot or otherwise return an upward-moving ball, return a soft shot: drop shot, dink, or lob. Which you chose depends on where you are on the court and other conditions. From the back or mid court, choose the drop shot. When at the net, dink. A lob over your opponents' heads can sometimes be beneficial as it sends at least one opponent back and may give you time to move up to the NVZ.

Advantage #3: Playing offense more than defense.
More points are won in pickleball by playing a good defense than a good offense.
  • Keeping the ball in play is foremost. If you can do only that, you will win every point, because eventually your opponent will fault. You don't need to make fancy corner shots or hard line drives. Just keep the ball in the court and don't fault.
  • Think ahead. Consider what your opponents will do next and prepare for it. Watch their eyes and body angles, as those will help you know where they're aiming their shot.
  • Study strategies so you'll know automatically which shot to make in each situation and how to counter your opponents' tactics. 

It's up to you to make your opponents' game difficult. Be tough!
0 Comments

Get Thee to the Non-Volley Zone Line!

2/15/2016

0 Comments

 
Picture
One of the hardest things for new players to do is get to the non-volley zone (NVZ) line safely when they are serving. When playing doubles, both serving players begin in the backcourt. This gives the opponents an immediate advantage since one of them starts at the NVZ and the other can run up, while you must wait due to the second-bounce rule. Then they usually hit balls long and hard, forcing you remain back.
 
Being as close to the net as possible provides a huge advantage. You don’t have to move as far to hit a ball, as shown in the diagram above: the woman at the net has much less distance to traverse to return the man's shot when she's at the NVZ. You’re also able to hit balls to the back court more easily and safely because you need less power and the angles are better. Finally, from the NVZ you can dink.

But how do you get there safely?

Current wisdom says your third shot should be a drop shot into the NVZ just over the net. Some players ask why, since you'd be inviting the opponent who's in the back court to run up to the NVZ. As I said earlier, chances are she's already done that, and the drop shot allows you time to move up, too. It also softens the game, making it nearly impossible for your opponents to hit a hard drive your way. When executed well, the ball lands low and soft, and your opponents must return the ball softly to make it over the net.

Executing drop shots and dinks well and consistently requires practice. Lots of it. But that practice pays off when you can remove the opponents' advantage and level the play. 

The other thing new players find difficult is to stand right behind the NVZ line with toes almost touching it. They lag back in midcourt or a few feet from the line because they're afraid they might step into the NVZ and volley. With practice, that doesn't happen often, and knowing where the NVZ is becomes a sixth sense. The main reason to stand close to the line is that your opponents can't target your feet. The height of the net makes that impossible when you're close to the line. Stand farther back and your shoes are perfect targets.

​When you are forced into the back court (by a lob, for example) during a rally and your opponents are at the net, you can turn to the drop shot again. Your hit has to be soft enough to bounce low, giving you time to run up again, and to prevent them from slamming the ball back. If you don't feel competent with the drop shot, a lob will also work.

0 Comments

The Five Elements of Pickleball Placement

10/18/2015

3 Comments

 
PictureDavid Bone competes in Sun City West, AZ. Photo copyright by Matt York.
When I watch high-level pickleball, I notice two things: the players plan and execute shots that seem effortless, and those shots land where they want them to. Their play seems effortless because they’ve practiced long and well (or else they’re naturally great players—some folks have that advantage). They’ve learned what shots work well in various circumstances, and they’ve learned the elements of good ball control and placement.
 
Mastering ball placement is critical for attaining higher levels in pickleball play. What factors determine where your ball will land?
 
1) The angle of your paddle (up and down & left and right)
2) The angle of your swing (up and down & left and right)
3) Your wrist movement, if any
4) The power behind your hit
5) Spin
 
Before you concentrate on ball placement, though, you must first consider how you contact the ball. Focus your attention and skills (such as good footwork and proper form with your stroke) to the contact of the ball. Only after this focus on ball contact should you consider how you place it on the court.
 
Take time to get into position early enough to take a proper backswing before hitting the ball. If that means halting in mid-court, so be it. Stop, prepare your swing, and focus on contacting the ball. Many players say you should think about “swinging through the ball,” as this makes 


Read More
3 Comments

The 1-2-3 Approach: Get to the Net After You Serve

2/3/2015

2 Comments

 
PictureThe Third-Shot Drop Shot
In my last tip, I explained why you want to rush to the non-volley-zone (NVZ) line: you are able to cover the court with far less movement. Other reasons are the additional power afforded to hard shots by the shorter distance, being able to target spots close to the net with more accuracy and ease, and the quick response time needed by your opponents to return your net volleys. (Of course, you need good reflexes to hit theirs, too.)

If you are serving, your team is at a disadvantage from the start. One of your opponents is already at the NVZ line, and the opponent receiving your serve will likely hit a long, relatively slow return shot that will provide enough time for them to rush to the net. You can't do anything about that, because you and your partner must remain in the back court to let the ball bounce (because of the "double-bounce" rule). 

Assuming your opponent returns the ball deep to center court, your best shot would be one that will give your team time to rush the net safely. Most players and coaches recommend you make a drop shot (some call this a dink) just over the net into the NVZ. This is a tough shot, as those who deliver the ball too far back in the court or into the net will tell you. This is considered the best shot, however, because 1) your opponents are already at the net, or they're on the way; 2) it is slower and softer, and because it drops in the NVZ, your opponents must let the ball bounce, allowing you time to get to your NVZ; and 3) it has a higher percentage of success than a hard shot against opponents who are ready to volley the ball back.

Discuss this tactic ahead of time, so your partner will know when to move with you. If your shot goes too deep, and you can't get to the NVZ in time, you and your partner must STOP and assume the ready position the moment your opponent hits the ball. Make sure your feet are shoulder-width apart and your paddle points toward the ball. You won't be in a good position, but you'll be ready to make the best of whatever comes your way.

2 Comments
<<Previous

    Subscribe for my best content

    Blog Mailing

    Author

    Gale Leach lives in Arizona with her husband, two dogs, and a cat. When she's not writing pickleball tips, she's working on the second in a new series of novels for young adults, a fifth book in the "Bruce" children's series, and updating The Art of Pickleball.

    Categories

    All
    Backhand
    Body Position
    Carbohydrates
    Chris Sacca
    Communication
    Control
    Court Position
    Dink
    Drills
    Errors
    Etiquette
    Extraordinary Tennis For The Ordinary Player
    Extraversion
    Falling
    Five Factor Test
    Food
    Health & Fitness
    Healthy
    Injury
    Level
    Meditation
    Mental Game
    Non-Volley Zone
    Paddles
    Patience
    Personality
    Pickleball
    Placement
    Practice
    Rating
    Relaxation
    Resolutions
    Right And Left Handed
    Right / Wrong
    Rules
    Safety
    Simon Ramo
    Singles
    Snacks
    Stacking
    Strategies & Tactics
    Strokes
    Tournament
    Unforced Errors
    Visualization
    Websites
    Winning And Losing
    Yoga

    Archives

    December 2018
    October 2018
    September 2018
    July 2018
    June 2018
    May 2018
    March 2018
    September 2017
    August 2017
    June 2017
    May 2017
    April 2017
    September 2016
    August 2016
    May 2016
    April 2016
    February 2016
    January 2016
    November 2015
    October 2015
    September 2015
    August 2015
    July 2015
    June 2015
    May 2015
    April 2015
    March 2015
    February 2015
    January 2015
    December 2014
    November 2014
    October 2014
    September 2014

    RSS Feed

© 2018 Gale H. Leach